
Podcast Studio Setup Guide — Gear, Racks, and Organization
Podcast Studio Setup Guide: Gear, Racks, and Organization
Most podcast setup guides focus on microphones and interfaces. Those things matter. But if you've been podcasting for more than a year, you already know the gear — what you're probably missing is a workspace that's organized, looks professional on camera, and isn't a constant source of cable frustration.
This guide is about the whole setup: what gear your studio needs, how to organize it, what furniture actually works, and how to make it look like you built it on purpose.
Part 1 — The Core Gear List
Before you can organize a podcast studio, it helps to know what you're organizing. Here's what a complete podcast recording setup typically includes, and how much rack space each piece takes
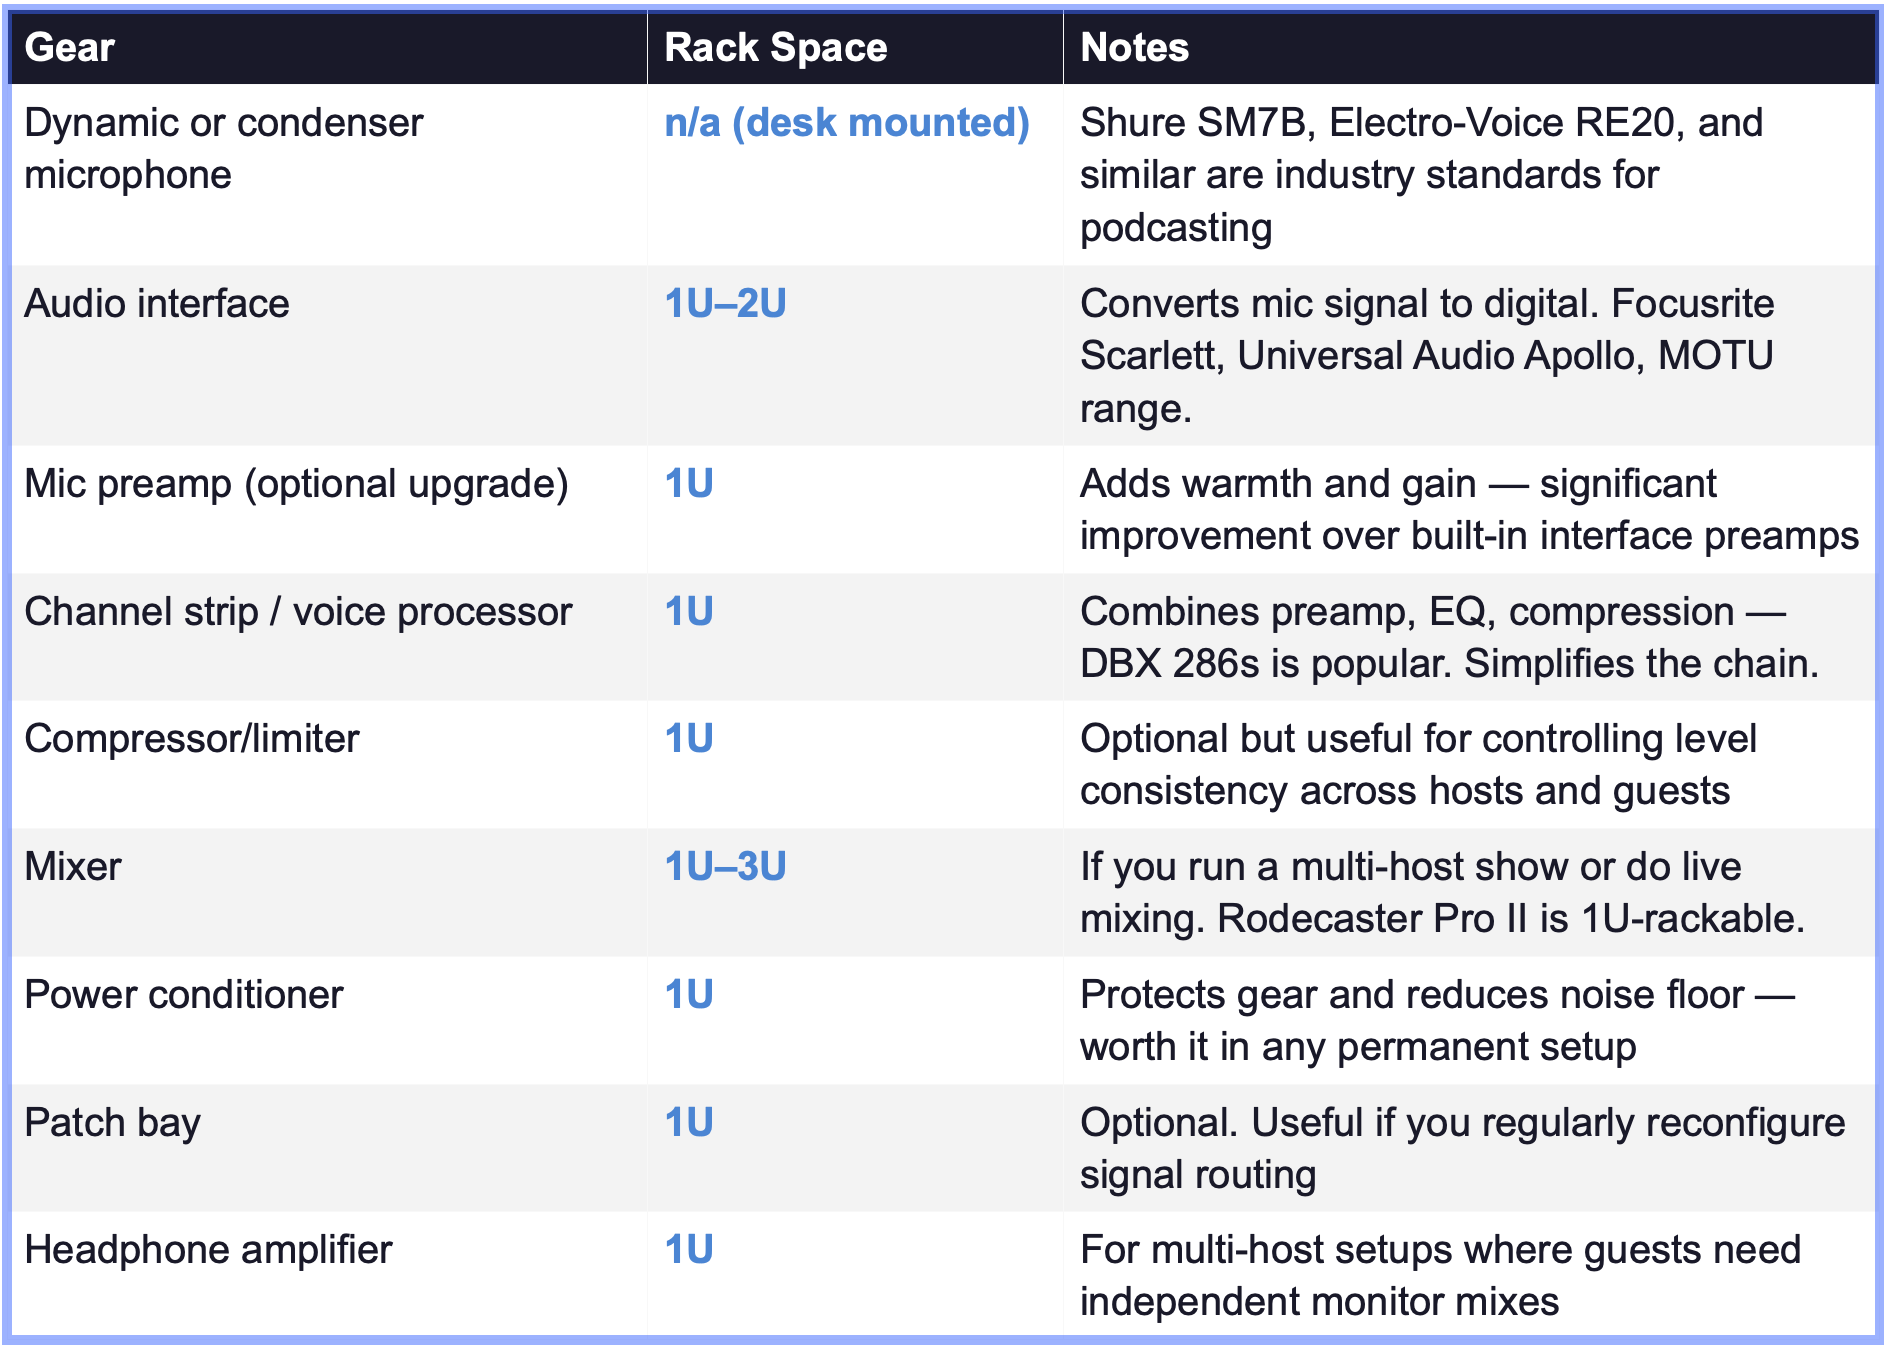
A solo podcast setup with interface, preamp, and power conditioner fits comfortably in 4U–6U. A multi-host setup with mixer, headphone amp, and compression stack typically needs 8U–12U. Plan for the setup you want in two years, not just what you have today.
Part 2 — The Rack Question: Do You Need One?
Short answer: if you have more than two pieces of outboard gear and you care about how your studio looks on camera, yes.
A rack keeps your gear stacked vertically in a single unit instead of scattered across your desk. It routes power through a single conditioner. It makes cable management possible instead of theoretical. And for video podcasters — which is most podcasters in 2026 — a rack in the background is a visual signal that communicates professionalism before you say a word.
The question isn't whether to rack. It's how many RU and what style.
Desk Topper Rack (2U–6U)
For solo hosts with a simple signal chain — interface, power conditioner, maybe a preamp — a small rack sits on your desk and keeps everything at arm's reach. This is the lowest-cost, lowest-footprint option and works well in home offices and small dedicated rooms.
Gear Hive Classic Collection racks in 4U or 6U are the most popular starting point for podcasters. They sit on a desk, hold what you need, and look significantly better than a pile of gear on a shelf.
Sidecar Rack (6U–12U)
A freestanding rack beside your desk — with legs or casters — keeps the desk surface clear while putting all your gear within reach. This is the configuration that photographs best and creates that 'real studio' look that appears behind professional podcasters on YouTube and Spotify.
For podcast studios where the background is part of the brand, the Gear Hive Stash (8U–12U slanted rack with enclosed storage cabinet below) is particularly useful — the cabinet hides cables, external drives, and accessories that would otherwise be visible on camera.
Integrated Desk Setup
Studio desks with built-in rack bays — like the Gear Hive Starter desk — put your gear inside the desk itself, eliminating the need for a separate rack unit. The rack bays flank the monitor position, keeping everything organized and within reach without taking up additional floor space. A good option for smaller rooms where a separate rack isn't practical.
Part 3 — Studio Organization: What Goes Where
The signal chain should flow top to bottom
The most important cable management principle in any podcast rack: arrange your gear in signal flow order, top to bottom. Mic signal goes in at the top (preamp/interface), processes down through compression and EQ, then out through monitoring and headphones at the bottom. This means cables run short distances and in one direction — a rack organized this way is easier to troubleshoot and looks cleaner from the back.
Power at the bottom, frequently accessed gear at eye level
Power conditioner goes at the bottom of the rack — it's heavy, you don't touch it often, and keeping mass low improves stability. Gear you adjust during recording (interface level, headphone mix, compression settings) goes at eye level or slightly below. Utilities like patch bays go wherever they fit after the other rules are satisfied.
Cable management is the difference between a studio and a pile of gear
Separate power and signal cables on opposite sides of the rack. Use a cable grommet for through-panel routing if your rack supports it. Label both ends of every cable before you route it. Use velcro ties — not zip ties — so you can adjust later. And fill any empty rack spaces with blank panels to control airflow and close the face of the rack.
Part 4 — The On-Camera Question
If you publish video — on YouTube, as video podcasts on Spotify, or on any platform where viewers can see your studio — what's visible in your frame matters. Here's how to make it work:
Position your rack at an angle in the background rather than directly behind you — this creates depth and makes the setup look larger than it is.
Use a consistent stain across your rack and any other wood furniture in frame — a matched set looks intentional.
Custom engraved rack panels with your show name are increasingly common among serious podcasters — a 1U panel with your podcast name is visible every episode and is a genuine branding moment.
The Gear Hive 12U Lucent LED sidecar adds ambient lighting to your rack that reads well on camera — warm, directional, and professional rather than the harsh ring light look.
Part 5 — Recommended Podcast Studio Setups at Three Budgets
The Lean Setup (~$500–$700 in furniture)
Classic Collection 4U rack in your preferred stain + desk topper position + matching wood rack panels for any empty spaces. Holds interface, preamp, and power conditioner. Clean, organized, looks intentional on camera.
The Mid Setup (~$900–$1,200 in furniture)
Gear Hive Stash (8U slanted rack with storage cabinet) on casters beside your desk. Holds full signal chain in the rack section; cables, drives, and accessories hidden in the cabinet. A visual upgrade that also solves the organization problem completely.
The Premium Setup (~$1,500–$2,500 in furniture)
Gear Hive Starter or Midway desk with integrated rack bays + matching Classic Collection sidecar + Lady Legs monitor stands in matching stain. The full Gear Hive ecosystem. Every piece matches, everything is organized, and the resulting studio looks like it was designed rather than assembled over time.
→ Shop podcast studio racks and desks at gearhivestudioracks.com